Quantcast
Channel: Windows Mobile 6 – Windows CE Programming
Viewing all 18 articles
Browse latest View live

Internet Explorer Mobile handles key events

$
0
0

WOW, IEM (tested from AKU 6.1.5) handles key events.

As you know (or should know), Internet Explorers before 6.1.4 ? did not handle key events. Although this may be not a problem with consumer devices, for rugged devices used in a professional environment, this was bad. Although there are more and more consumer windows mobile devices providing a keyboard with more than 6 keys. Industrial devices have much more keys:

cn3_key

The companies had to design around using a keyboard interface in there web application or use special browsers that support key events. Now a new area starts with IEM 6.1.4.

I tested IEM on a ITC device with a numeric input and the test page (see here) works fine:

iem_onkey

The screen shows the test page after I pressed the ’2′ key on the keyboard. Unfortunately I was not yet able to test against function keys yet.

DOWNLOAD:OnKey test html file - Test reaction of javascript onkey in internet explorer (mobile) (Hits: 266, size: 1.97 KB)

have fun

Josef


Mobile Developement – RDP AutoLogin extended (version 4)

$
0
0

Hello

on the wish of the one or other user I extended the RDP AutoLogin code and we now reached level 4.

The new code simply has only one extension, it supports the color depth selection. Also the color depth and other settings are visible on the dialog of Remote Desktop Mobile, the settings itself are done via the Default.rdp file. But you are right, RDP_AutoLogin also controls some of the dialog items directly.

[codesyntax lang="text"]

...
Domain:s:
ColorDepthID:i:3
ScreenStyle:i:0
DesktopWidth:i:640
DesktopHeight:i:480
UserName:s:rdesktop
...
ServerName:s:192.168.128.5
SavePassword:i:1
...

[/codesyntax]

The color depth setting supports two modes, 8 Bit with 256b colors (ColorDepthID:i:1) and 16 Bit with ~65000 colors (ColorDepthID:i:3).

[codesyntax lang="reg"]

REGEDIT4

[HKEY_LOCAL_MACHINE\Software\RDP_autologin]
"FitToScreen"="1"
"FullScreen"="1"
"Status"="connecting..."
"Save Password"="1"
"Domain"=""
"Password"="Intermec+2004"
"Username"="rdesktop"
"Computer"="192.168.0.130"
"DesktopWidth"=640
"DesktopHeight"=480
"startOnExit"="\\rdp_keepBusy.exe"
"execargs"="noRDPstart"
"UseMouseClick"="0"	//added with version 3 to switch between mouse and keyboard simulation
"ColorDepth"=1		//added with version 4 to enable switching between 8 and 16 Bit colors

[/codesyntax]

The code changes are small. Some code addition to read the value from the registry and some to write the rdp file:

[codesyntax lang="cpp"]

void readReg(){
...
        //ColorDepth new with version 4
        if(RegReadDword(L"ColorDepth", &dwTemp) == 0)
            dwColorDepth=dwTemp;
...
}
void writeRDP(){
...
			else if(wcsstr(rdpLines[c].line, L"ColorDepthID")!=NULL){
				wsprintf(szTemp, rdpLines[c].line, dwColorDepth);  //3=HighColor(16Bit) or 1=(8Bit) color
			}
...
}

[/codesyntax]

Additionally I have added a new project to the solution to enable to set all the settings not only via the registry but using a GUI application. RDP_Autologin_Settings is born:


As you see, there is also a small file browser integrated. The default OpenFile dialog of Compact Framework does not allow you to browse all directories, but only “\My Documents”.

RDP AutoLogin Settings Editor (exe): DOWNLOAD:RDP AutoLogin Settings editor - (Hits: 270, size: 10.45 kB)
source (Visual Studio 2008 WM5 SDK project): DOWNLOAD:RDP AutoLogin Settings editor Source Code - (Hits: 164, size: 21.23 kB)

RDP_AutoLogin (exe): DOWNLOAD:RDP AutoLogin Executable - (Hits: 272, size: 6.78 kB)
source (Visual Studio 2008 WM5 SDK project): DOWNLOAD:RDP AutoLogin Source Code - (Hits: 165, size: 56.85 kB)

RDP_KeepBusy (exe): DOWNLOAD:RDP KeepBusy (executable) - (Hits: 224, size: 3.17 kB)
RDP_KeepBusy (vs2008 WM5 SDK project): DOWNLOAD:RDP KeepBusy Source Code - (Hits: 152, size: 12.92 kB)

Have fun

Josef

Windows Mobile: Kiosk Mode Series, part 1

$
0
0

Hello

I would like to start a series of articles of how you can lockdown your application user in your application. How can you achieve a kiosk mode application, where the user is only allowed to do what you define.

The first article is about the Windows Start and Done Icon in menu bar and about fullscreen. You may already know, how to hide the start and done icon permanently from a Windows Embedded Handheld (Windows Mobile 6.5.3) device: Link

But there is also a temporary way using the same approach. The trick is to change the registry keys, that make the OS believe you have hardware buttons for Start and Done, BEFORE you show your CSharp form.

Before Windows Embedded Handheld (WEH, or Windows Mobile 6.5.3), you are able to use SHFullScreen API calls. But this will not work with WEH. Neither the flags SHFS_HIDESIPBUTTON nor SHFS_HIDESTARTICON will work. The LockDown.cs class also includes code for that and you may test the functions with the Test-Application.

The class I am talking about is called LockDown. There is also a Test-Application (OEMTitleBarHandler, dont ask me about the name selection) to test all functions I will describe.


Left is Windows Mobile 6.1 and right image shows Windows Embedded Handheld 6.5.3! You can use the ShFullScreen menu on both, but it will only work with Mobile 6.1. But the test “Form without StartIcon” will bring up a form without Start button.

OK, let’s look what we can do to hide the Start icon for a new form:

[codesyntax lang="csharp"]

        private void mnuStartIconTestForm_Click(object sender, EventArgs e)
        {
            Lockdown.LockDown.SaveRegistryFullScreen();
            Lockdown.LockDown.SetRegistryFullScreen(true, false, false);
            LockDownTestForm frm = new LockDownTestForm();
            frm.ShowDialog();
            Lockdown.LockDown.RestoreRegistryFullScreen();
            frm.Dispose();
        }

[/codesyntax]

The function SaveRegistryFullScreen() save the state of the registry values of TextmodeEnabled, HardwareStartKeyEnabled and HardwareDoneKeyEnabled below “HKLM\SOFTWARE\Microsoft\Shell\BubbleTiles”.

The function SetRegistryFullScreen(bool bStartButtonPresent, bool bDoneButtonPresent, bool bTextMode) sets the registry key according to the args. So, if  bStartButtonPresent is set to true, the registry value of HardwareStartKeyEnabled  is set to 1. With this setting, the next form or window is shown without Start button. Easy, isn’t it. The other args work similar.

RestoreRegistryFullScreen will restore the registry to the state saved with SaveRegistryFullScreen().

How can you remove all buttons that enable the user to quit or minimize a form? To show a compact framework form with or without Done or Minimize buttons, you just have to set the right properties of the form. But dont forget to give the user an option to get back from a form.

The ControlBox property switches the (X)/ (OK) button display. The clicking an (OK) button will close and exit a form or application:

[codesyntax lang="csharp"]

        private void mnuControlBox_Click(object sender, EventArgs e)
        {
            if (this.ControlBox)
            {
                //show the (X) button, hide OK button
                this.ControlBox = false;
                mnuControlBox.Checked = false;
            }
            else
            {
                //remove the (X) button in title, show the OK button
                this.ControlBox = true;
                mnuControlBox.Checked = true;
            }
        }

[/codesyntax]

The MinimizeBox property of a compact framework form switches the (OK) button to a (X) button. Where (X) stands for minimize window.

[codesyntax lang="csharp"]

        private void mnuMinimizeBox_Click(object sender, EventArgs e)
        {
            if (this.MinimizeBox)
            {
                //hide minimize button (OK)
                this.MinimizeBox = false;
                mnuMinimizeBox.Checked = false;
            }
            else
            {
                //show minimize button (OK)
                this.MinimizeBox = true;
                mnuMinimizeBox.Checked = true;
            }
        }

[/codesyntax]

The Test application has also menu options to test these properties as “Window Options”.


The menu option Maximize shows the testform maximized (oh, wonder), but that means only, that the taskbar at the top is hidden and the client area is larger. If you additionally set the menu to null, you will get a real full screen form:


You have to press the Escape key (hopefully you have one) to bring the menu back in the test application.

The class file LockDown offers some more functions, but these are left for another article.

The whole code with the test application is available here. You need a subversion client like TortoiseSVN or AnkhSVN to checkout the source code.

Download LockDown.cs: DOWNLOAD:LockDown.cs - (Hits: 619, size: 2.19 kB)

Windows Mobile: Kiosk Mode Series, part 2

$
0
0

In the first part of this series I showed how to make your compact framework application full screen or remove the Start icon from the menu bar. Now we will take a look at the task bar.

The task bar is at the top of your screen (except for fullscreen applications) and shows valuable information like the connection status, battery status or the current time.

Not full screen, taskbar not locked

This is a kiosk mode risk. The user is able to click the symbols in the taskbar and gets a popup menu with some icons. These icons enable the user to change connection settings, power management settings and others. You propably do not want to allow the user to make changes to some or all of the possible changes.

For example, clicking on the phone or signal strength icon will bring up this dialog:

The user can then change connection settings and activate or deactivate radios. Possibly a source for a bunch of support calls, if the user accidently changes connection settings.

Full screen, no taskbar

You can make your application fullscreen and all this status information is no more visible to the user. You should then provide the user with your own set of status information.

Do not leave the user in an unknown state. He/she should at least know the battery and connection status.

Not full screen, taskbar locked

The simplest way to show the user status information but disallow any changes is to show the taskbar but in a disabled state.

The attached class FullScreen has a simple function to lock or unlock the taskbar:

        public bool enableTaskbar(bool bEnable)
        {
            bool bRet = false;
            IntPtr hTaskbar = FindWindow("HHTaskBar", String.Empty);
            if (hTaskbar != IntPtr.Zero)
                bRet = EnableWindow(hTaskbar, bEnable);
            return bRet;
        }

The demo application can be used to test the function:

If “Lock Taskbar” is checked, a user can not invoke the popup menu and will only here a beep, when the taskbar is clicked. Disabling the taskbar is the simplest way to keep the user from using the taskbar.

Not full screen, taskbar not locked, using custom settings applications

If one clicks any of the icons in the popup menu, Windows Mobile launches a defined application with a command line argument. The assignments are defined in the registry of the device. You can leave the taskbar enabled and present the user your custom status applications.

I call the popup menu of the taskbar also “titlebar pulldownlist”. In the class CustomTitleBar I have implemented a function that replaces the windows mobile handler application for an icon. For example, you can replace the handler application for the dataconnection icon (the most left near the Zoom icon) by setting the registry value
:TASKBAR_DATACONNECTION in key
“HKEY_LOCAL_MACHINE\Software\Microsoft\Shell\Rai”
to your own, custom, application.

HKEY_LOCAL_MACHINE\Software\Microsoft\Shell\Rai
    :TASKBAR_DATACONNECTION
        "0"="OEM_DataConnection"
        "1"="\windows\OEMTitleBarHandler.exe /DataConnection"
    :TASKBAR_RADIOSIGNAL
    :TASKBAR_VOLUME
    :TASKBAR_BATTERY
    :TASKBAR_CLOCK
see also MSDN.
The below code snippet shows how to use the class to set a custom handler application.
        public static bool setCustomHandler(titleBarEvents titleName)
        {
            string regName = ":" + titleName.ToString();
            string sKey = sSubKey + @"\" + regName;
            bool bRet = true;
            try
            {
                RegistryKey regKey = Registry.LocalMachine.OpenSubKey(sKey, true);
                if (regKey == null)
                {
                    regKey = Registry.LocalMachine.CreateSubKey(sKey);
                }
                regKey.SetValue("0", "OEM_DataConnection", RegistryValueKind.String);
                regKey.SetValue("1", @"\windows\OEMTitleBarHandler.exe" + " /" + titleName, RegistryValueKind.String);
                regKey.Flush();

                regKey.Close();
            }
            catch (Exception ex)
            {
                System.Diagnostics.Debug.WriteLine("Exception in setCustomHandler(): " + ex.Message);
                bRet = false;
            }
            return bRet;
        }

The class is simple to use. After the custom handler is installed (no reboot required), you will get your custom app shown, if you click the dataconnection (or other) icon.

        private void mnuSet_Click(object sender, EventArgs e)
        {
            textBox1.Text = "";
            if(CustomTitleBar.setCustomHandler(CustomTitleBar.titleBarEvents.TASKBAR_DATACONNECTION))
                addText("setCustomHandler = OK");
            else
                addText("setCustomHandler = Failed");
            dumpSettings();
        }

At the top of the window of the demo app you can read:

/TASKBAR_DATACONNNECTION

This is the command line argument passed to the titlebar handler application.

With the class CustomTitleBar you can set, get and reset the handler applications.

Downloads

DOWNLOAD:CustomTitleBar.cs - (Hits: 247, size: 1.32 kB) DOWNLOAD:FullScreen.cs - (Hits: 253, size: 2.36 kB)

Full source with demo app available at code.google.com/p/weh653kiosmodes/source/checkout (you need a subversion client like TortoiseSVN or the VisualStudio AddOn AnkhSVN)

Windows Mobile: CF how to catch F1 and F2 in WEH

$
0
0

Before WEH and Windows Mobile 6 it was easy to catch all keys including the function keys in a Compact Framework (CF) application, you simply had to use Allkeys(true) and Form.Keypreview=true.

Actually, with Windows Embedded Handheld (WEH) or Windows Mobile 6.5.3 the above will not work for the F1 and F2 key. There are simply no KeyDown and KeyUp events reaching your CF application.

Windows Mobile 6.1 demo

with IMessageFilter active, F1 and F2 can be captured

After removing IMessageFilter no F1 and F2 keys are being captured

With WEH Microsoft moved the Start button from the taskbar at top to the menu bar at bottom. Further on, the menu bar is now using graphic tiles to display the top menu, the Close and OK/Done option. The OK/Close button also moved from taskbar to menu bar. Additionally the menu bar is higher than in Windows Mobile 6.1. That leaves less space for your client window.

Due to the above changes in the UI, the window messages are routed in another unknown way and normally a CF application does not get F1 and F2 key messages. Possibly the CF main message queue gets notification messages but these are handled internally by the CF runtime, you only see the menus are working.

Windows message routing

How to overcome this restriction

I tried several approaches to get the F1 and F2 keystrokes in a test CF application.

  • Using a Microsoft.WindowsCE.Forms MessageWindow with a WndProc fails. [CF MessageWindow approach]
  • Using SetWindowLong with a WndProc replacement fails, if used only on the form handle. But you may use that and implement it  for every  child element in the form. It looks like the messages are not routed thru the main fom WndProc (see  native winapi below), or lets say, the F1 and F2 keys do not bubble from child to parent as seen in a Win32 API window application. [Subclassing approach]
  • using OpenNetCF Application2/ApplicationEx and an IMessageFilter works. If you already use or see other needs for   OpenNetCF/SmartDeviceFramework, you may use this approach. [SmartDeviceFramework Application2/IMessageFilter approach]
  • using a global keyboard hook works. That is the one I prefer, as it easy to use and gives all keyboard messages. [KeybdHook approach]

Native Win32 window application

In a native window application you create a new window class, provide a WndProc and a message queue handler and init the
class. If you need a textbox or a button, you create a window insde the main window using a pre-defined windows class (let
me call them stock window classes).

All these windows have there own WndProc. The a stock window classes handles standard messages itself. Messages that are not
handled by a window should call DefWindowProc. So unhandled messages are transfered from a focused child window to its
parent window and it’s WndProc. Stock window classes provide much functionality itself, for example an edit stock window
handles cursor movement, cut copy and paste of text, painting and much more.

If a stock window class does not handle a message like the F1 keydown message, it returns it to its parent window, normally your main window. Now your main window WndProc can react on this message with a WM_KEYDOWN handler and inform the OS that it handled the message. The message is then removed from the global message queue. If your code let windows know, that you dont handled the message (return FALSE), the message is returned and can be handled by the OS. If no window handles the message, the OS discards the message of the message queue.

The above works fine with function keys, if your app uses Allkeys(true). If you do not use Allkeys(true), the OS (the Windows Mobile GWES (Graphic Windowing Event System)) handles the message BEFORE it is dispatched to other windows. As GWES handles the message itself, for example to do Volume Up/Down with F6/F7 key presses, it is NOT placed in the message queue for any other window. When you press F1 or F2 GWES opens the left or right main menu of the foreground app (if it has a menu).

Using Allkeys workes fine with native window apps. The window app’s WndProc gets keyup and keydown messages for the function keys too, even for F1 and F2.

Allkeys works also fine with CF apps before WEH, for example within Windows Mobile 6.1. But in WEH a CF app does not get the F1 and F2 key stroke. Thanks to Microsoft (also for malfunction of SHFullScreen in WEH, but this is another story).

The different approaches

Keytest3AKsdf

This example shows the usage of IMessageFilter of the Smart Device Framework (SDF) and its Application2/Ex class. In your program starter you simply have to change the Run function to:

            //Application.Run(new Keytest3AKsdfForm());
            Application2.Run(new Keytest3AKsdfForm());

You see, instead of starting your app with Application.Run you use the SDF Application2.Run call. Additionally you have to use:

        public Keytest3AKsdfForm()
        {
            InitializeComponent();
            _hwnd = new List<IntPtr>();
            _hwnd.Add(this.Handle);
            _hwnd.Add(this.listView1.Handle);
            Application2.AddMessageFilter(this);
            win32.AllKeys(true);
...
        List<IntPtr> _hwnd;
...
        public bool PreFilterMessage(ref Message m)
        {
            System.Diagnostics.Debug.WriteLine("msghandler1: " + 
                m.HWnd.ToInt32().ToString("X8") +
                ", " + m.Msg.ToString("X8") +
                ", " + m.WParam.ToInt32().ToString("X8") +
                ", " + m.LParam.ToInt32().ToString("X8"));

            //only process msg to our windows
            if (_hwnd.Contains(m.HWnd))
                return MsgHandler(m);
            else
                return false;

        }

        private bool MsgHandler(Message m)
        {
            if (m.Msg == WindowsMessages.WM_KEYDOWN || m.Msg == WindowsMessages.WM_KEYUP)
            {
                //add the msg to our listview
                addItem(m);
                Keys k = (Keys)m.WParam.ToInt32();
                System.Diagnostics.Debug.WriteLine("msghandler2: " + m.HWnd.ToInt32().ToString("X8") +
                    //", " + m.Msg.ToString("X8") +
                    ", " + ((WindowsMessages.WM_MESG)m.Msg).ToString() +
                    ", " + m.WParam.ToInt32().ToString("X8") + 
                    ", " + m.LParam.ToInt32().ToString("X8"));
                if (_bForwardKeys == false)
                    return true;//let windows now that we handled the message
                else
                    return false;
            }
            return false;//let windows now that we DID NOT handled the message
        }

The first lines use a list of handles (IntPtr) to later filter messages by GUI components.

Then the line Application2.AddMessageFilter(this); adds an IMessageFilter for the form. Now, your form’s code has to implement a function “public bool PreFilterMessage(ref Message m)”. This function is called, when a message is sent to your form (mouse movements, clicks, keyboard events etc). In the above code, I first check the provided window handle against the list of handles to filter. Then MsgHandler is called and processes WM_KeyDown/Up messages only.

The line win32.AllKeys(true); prevents the OS to process keyboard messages itself (ie menu (F1/F2), Volume Up/Down (F6F7)). There is an additinol win32 class that implements a set of native windows API calls.

Internally SDF uses a custom message pump (see also the native message pump using while(GetMessage){…). This message pump is invoked before the compact framework form’s message pump and gives access to F1 and F2, whereas the compact framework itself did not.

The keyboard hook approach

This example uses a keyboard hook library. In the form’s code you use it this way:

    public partial class Keytest3AKcs : Form
    {
        //HookKeyboard
        Keyboard.KeyHook.KeyboardHook _keyboardHook;

        public Keytest3AKcs()
        {
            InitializeComponent();
            win32.AllKeys(mnuAllkeys.Checked);
...
            try
            {
                //test with keyhook
                _keyboardHook = new KeyHook.KeyboardHook(this);
                _keyboardHook.HookEvent += new KeyHook.KeyboardHook.HookEventHandler(_kHook_HookEvent);
...
            }
            catch (SystemException ex)
            {
...
                _keyboardHook = null;
            }
        }
        void _kHook_HookEvent(object sender, KeyHook.KeyboardHook.HookEventArgs hookArgs)
        {
            addLog("HookEvent: " + //win32.helpers.hex8(hookArgs.Code) + ", " +
                win32.helpers.hex8(hookArgs.wParam) + ", " +
                win32.helpers.hex8(hookArgs.hookstruct.vkCode) + ", " +
                win32.helpers.hex8(hookArgs.hookstruct.scanCode) 
                );
            addItem(hookArgs);
        }

First we define a new object of type KeyboardHook. Then we need to initialize this class with the form and then add an event handler for the keyboard messages.

The keyboard class is located in a library project of its own and in general uses SetWindowsHookEx. Here is only a small snippet of the libs code:

            public void Start()
            {
                if (_hook != IntPtr.Zero)
                {
                    //Unhook the previouse one
                    this.Stop();
                }
                _hookDeleg = new HookProc(HookProcedure);

                _hook = NativeMethods.SetWindowsHookEx(
                    NativeMethods.WH_KEYBOARD_LL,
                    _hookDeleg,
                    NativeMethods.GetModuleHandle(null),
                    0);
                if (_hook == IntPtr.Zero)
                {
                    throw new SystemException("Failed acquiring of the hook.");
                }
            }

I wrote the code as a lib to be able to make it usable for VB programmers to.

Keytest3AKvb

Here is the code to use the keybd lib in compact framework VB:

Imports KeybdHook

Public Class Form1
    Dim WithEvents _keyhook As KeybdHook.KeyHook.KeyboardHook
    Dim _bForwardKeys As Boolean = False

    Private Sub Form1_Load(ByVal sender As System.Object, ByVal e As System.EventArgs) Handles MyBase.Load
        initListView()
        _keyhook = New KeybdHook.KeyHook.KeyboardHook(Me)
        'AddHandler _keyhook.HookEvent, AddressOf hookProc 'do not use or you will get messages twice
        win32.AllKeys(True)
    End Sub

    Public Sub hookProc(ByVal sender As Object, ByVal hookArgs As KeybdHook.KeyHook.KeyboardHook.HookEventArgs) Handles _keyhook.HookEvent
        'System.Diagnostics.Debug.WriteLine("hookProc: " + hookArgs.wParam.ToInt32().ToString("X8"))

        addItem(hookArgs)
        Select Case hookArgs.wParam.ToInt32()
            Case WindowsMessages.WM_KEYDOWN
                System.Diagnostics.Debug.WriteLine("WM_KEYDOWN: " + hookArgs.hookstruct.vkCode.ToString("X8"))
            Case WindowsMessages.WM_KEYUP
                System.Diagnostics.Debug.WriteLine("WM_KEYUP: " + hookArgs.hookstruct.vkCode.ToString("X8"))
        End Select
    End Sub

Here is the screen of Keytest3AKvb:

Downloads

Code and binaries at: CodePlex

Windows Mobile: redirect function keys into Internet Explorer Mobile browser

$
0
0

iHookIE6

this small tool enables you to use Function keys within Internet Explorer Mobile (IEM) web sites.

Normally, most function keys are catched and used by the OS (GWES) to perfom special actions like menu softkeys, phone call, end phone, volume up, volume down and more.

Using a keyboard hook we can catch the function key presses, or better say WM_KEYDOWN and WM_KEYUP messages before the OS can catch them.

One challenge was to find the window that processes normal key presses. The keyboard windows messages are not send to the top level window. Using the Remote Spy Tool I found the Window inside Internet Explorer window that finally processes keyboard messages. Now the tool can hook the keyboard, catch F key presses (F1 to F24) and send them directly to the browser window (class name = “Internet Explorer_Server”). The tool simply uses FindWindow and GetWindow to locate the window handle of this window and then does a PostMessage with WM_KEYDOWN and WM_KEYUP directly to the browser window.

The hook function:

__declspec(dllexport) LRESULT CALLBACK g_LLKeyboardHookCallback(
   int nCode,      // The hook code
   WPARAM wParam,  // The window message (WM_KEYUP, WM_KEYDOWN, etc.)
   LPARAM lParam   // A pointer to a struct with information about the pressed key
) 
{
    static int iActOn = HC_ACTION;
    bool processed_key=false;
    int iResult=0;
    if (nCode == iActOn) 
    { 
        HWND hwndBrowserComponent=getIEMBrowserWindow();    //get the browser window
        if(getIEMWindow(&iResult)==NULL || hwndBrowserComponent==NULL)    // if IE is not loaded or not in foreground or browser window not found
            return CallNextHookEx(g_hInstalledLLKBDhook, nCode, wParam, lParam);

        PKBDLLHOOKSTRUCT pkbhData = (PKBDLLHOOKSTRUCT)lParam;
        //we are only interested in FKey press/release
        if(pkbhData->vkCode >= VK_F1 && pkbhData->vkCode <=VK_F24){
            DEBUGMSG(1,(L"found function key 0x%08x ...\n", pkbhData->vkCode));
            if(processed_key==false){
                if (wParam == WM_KEYUP)
                {
                    //synthesize a WM_KEYUP
                    DEBUGMSG(1,(L"posting WM_KEYUP 0x%08x to 0x%08x, lParam=0x%08x...\n", pkbhData->vkCode, hwndBrowserComponent, g_lparamCodeUp[pkbhData->vkCode - 0x70]));
                    PostMessage(hwndBrowserComponent, WM_KEYUP, pkbhData->vkCode, g_lparamCodeUp[pkbhData->vkCode - 0x70]);
                    processed_key=true;
                }
                else if (wParam == WM_KEYDOWN)
                {
                    //synthesize a WM_KEYDOWN
                    DEBUGMSG(1,(L"posting WM_KEYDOWN 0x%08x to 0x%08x, lParam=0x%08x...\n", pkbhData->vkCode, hwndBrowserComponent, g_lparamCodeDown[pkbhData->vkCode - 0x70]));
                    PostMessage(hwndBrowserComponent, WM_KEYDOWN, pkbhData->vkCode, g_lparamCodeDown[pkbhData->vkCode - 0x70]);
                    processed_key=true;
                }
            }
        }
    }
    else
        DEBUGMSG(1, (L"Got unknwon action code: 0x%08x\n", nCode));
    //shall we forward processed keys?
    if (processed_key)
    {
        processed_key=false; //reset flag
        if (bForwardKey){
            return CallNextHookEx(g_hInstalledLLKBDhook, nCode, wParam, lParam);
        }
        else
            return true;
    }
    else
        return CallNextHookEx(g_hInstalledLLKBDhook, nCode, wParam, lParam);
}

You will see, that the web site code in IEM can now process these function key presses using the body onKeyDown event.

the browser window with a javascript key demo:


(see also onkey.htm in http://www.hjgode.de/wp/2009/05/14/internet-explorer-mobile-handles-key-events/)

The same will not work, if you switched the browser engine from IE6 (or MSHTML) to PocketIE using the HKLM\Security\Internet Explorer\MSHTML=”0″ entry.

Screenshot shows that function keys are sent to the browser window. But you will see no reaction inside the web site.

Only the newer engine, started with Windows Mobile AKU 6.1.4, supports keyboard events inside the javascript object model.

To find the browser window, you normally would use EnumChildWindows(), but this API is not available on Windows CE based devices. So I re-used some code to scan a window for child and sibling windows to find the nested browser window:

//search for a child window with class name
static BOOL bStopScan=FALSE;
BOOL scanWindow(HWND hWndStart, TCHAR* szClass){
    HWND hWnd = NULL;
    HWND hWnd1 = NULL;    
    hWnd = hWndStart;
    TCHAR cszWindowString [MAX_PATH]; // = new TCHAR(MAX_PATH);
    TCHAR cszClassString [MAX_PATH]; //= new TCHAR(MAX_PATH);
    TCHAR cszTemp [MAX_PATH]; //= new TCHAR(MAX_PATH);
    BOOL bRet=FALSE;
    while (hWnd!=NULL && !bStopScan){
        //do some formatting
        GetClassName(hWnd, cszClassString, MAX_PATH);
        GetWindowText(hWnd, cszWindowString, MAX_PATH);
        wsprintf(cszTemp, L"\"%s\"  \"%s\"\t0x%08x\n", cszClassString, cszWindowString, hWnd);//buf);
        //DEBUGMSG(1, (cszTemp));
        if(wcsicmp(cszClassString, szClass)==0){
            DEBUGMSG(1 , (L"\n################### found target window, hwnd=0x%08x\n\n", hWnd));
            //set global hwnd
            g_hWndIEM6=hWnd;    //store in global var
            hWnd=NULL;
            hWndStart=NULL;
            bRet=TRUE;
            bStopScan=TRUE;
            return TRUE;    //exit loop
        }
        // Find next child Window
        hWnd1 = GetWindow(hWnd, GW_CHILD);
        if( hWnd1 != NULL ){ 
            scanWindow(hWnd1, szClass);
        }
        hWnd=GetWindow(hWnd,GW_HWNDNEXT);        // Get Next Window
    }
    return bRet;
}

Thanks to all the code providers in the internet. Keep coding and publishing.

Download (VS2008/WM5 SDK C++ project and binary)

DOWNLOAD:iHookIE6_v20120927.zip - VS2008 source code, WM5 SDK, DEBUG binary (Hits: 153, size: 42.58 kB)

RDM_Keepbusy has been updated

$
0
0

I fixed a bug in RDM_KeepBusy. It worked only for the first session and not after close/open another session. Please always use the subversion code.

Internet Explorer Mobile – To zoom or not to zoom

$
0
0

With Windows Mobile 6.5.3, sorry, Windows Embedded Handheld 6.5.3 we have the Internet Explorer Mobile 6 engine.

weh-version

Although it may look nice for the one or other, the rendering, especially the zoom in and out is unusable for commercial use. The IT departments of Warehouses and Stores designed there mobile web pages for a fixed size layout of 240×320 (QVGA). Using IEM (Internet Explorer Mobile) these pages do not show well. Either they are to small to read or, if zoomed in, the user has to scroll here and there. Not very usable. Event the Fit-To-Screen option does not help.

The predefined viewport or 1024×768 may be good for browsing non-mobile web sites but I was unable to find a suitable setting for mobile sites with a fixed QVGA or VGA layout.

Here comes the tipp found at xda-developers: change the default viewport size to match your needs:

Default:
HKCU\Software\Microsoft\Internet Explorer\Main
Viewport Height = dword:00000258(600)
Viewport Width = dword:00000320(800)

Landscape optimized (VGA)
HKCU\Software\Microsoft\Internet Explorer\Main
Viewport Height = dword:000001e0(480)
Viewport Width = dword:00000280(640)

Portrait optimized (VGA)
HKCU\Software\Microsoft\Internet Explorer\Main
Viewport Height = dword:00000280(640)
Viewport Width = dword:000001e0(480)

I assume you will find these better for commercial use than the desktop settings.

Unfortunately these settings are not used on every windows embedded device. So, you may give it a try and if it works for you, fine. I tested one device and iexplore.exe did not care about these entries. I checked with RegLoggerCE and found that iexplore.exe on that device does not query the above settings. For anyone interested, here is the log file of registry access of iexplore.exe captured with regLoggerCE: DOWNLOAD:regLoggerCE log file for iexplore within WEH653 - (Hits: 93, size: 10.66 kB)


Internet Explorer Mobile – QVGA web site do not scale well to VGA screen

$
0
0

As described in this post, I was looking for a way to get a proper view of pages designed for QVGA screens on devices with higher resolutions like VGA.

1) SAP ITS mobile screen on VGA Internet Explorer Mobile

1) SAP ITS mobile screen on VGA Internet Explorer Mobile

2) SAP ITS mobile screen on VGA display with viewport width=240 and zoom=2

2) SAP ITS mobile screen on VGA display with viewport width=240 and zoom=2

The trick is to use the non-standard viewport META tag. As described here, here and here, you can use meta-viewport to define the initial viewport, the part of the page you want to see and a zoom level.

Fortunately the meta tag for viewport works within Internet Explorer Mobile (Windows Embedded Handheld 6.5.3).

weh-version

The differences between the html code of image 1) and image 2) is just one additional line in the head section of the code for image 2):

<meta name="viewport" content="width=240, initial-scale=2, maximum-scale=2, minimum-scale=2">

This line makes the viewport equal to the PocketPC QVGA width of 240 pixel and specifies a zoom level of 2 to enlarge the viewport onto the VGA screen with a width of 480.

Now, my final goal is to disable the Zoom bar of Internet Explorer Mobile.

See also this post about QVGA and VGA scaling.

Windows Mobile 6.5: Changed Screen Geometry

$
0
0

Screen layout changes from Windows Mobile 6.1 to Windows Mobile Embedded Handheld 6.5

The Windows Mobile screen geometry changed from Windows Mobile 6.1 and before to the actual Windows Mobile 6.5 (also called Windows Embedded Handheld). Not only the geometry changed, the layout also changed. The Start icon is now moved to the bottom whereas before WM65 the start icon was on the left in the taskbar.

wm61screen   wm65screen

The taskbar and the menubar was about 26 pixels in height. With WM65 the taskbar is about 18 pixels in height and the menu bar occupies 34 pixels in height.

QVGA screen geometry

Windows Mobile 6.1

Windows Mobile 6.5

taskbar

26

18

menubar

26

34

client size

240;268

240;268

client size height no taskbar

240;294

240;302

client size height no menubar

240;294

240;286

You can see that assuming a fixed client size will give problems with the layout of the application, especially if menubar and taskbar height are assumed as being 26 pixels all the time.

Applications that only use the client size with the taskbar and menubar visible, will show normally, as the resulting client size does not differ between WM61 and WM65.

Application geometry

Applications that use any code to make there window more or less fullscreen have to adopt for the new layout of the screen. Applications that do not use code to adopt there screen to the new layout may look like this:

geometry_wm61_QVGA_sample1   geometry_wm65_QVGA_sample1

The screen moves slightly outside top assuming 26 pixels for taskbar and menubar and so the ‘fullscreen’ app does not not cover the bottom menu bar completely.

If an app has used correct coding it would display better on WM65 (wrong coded Citrix 11.5 here):

geometry_wm65_VGA__sample5    geometry_wm65_VGA__sample5_showfullscreen

High Resolution awareness

Applications

A long time nearly all Windows Mobile device came with a QVGA screen resolution only. Now you may be faced by a Windows Mobile VGA screen resolution, whereas consumer smartphones come with many different screen resolutions.

Windows Mobile 6 will adopt non-hires aware applications automatically to the screen resolution. The OS looks for a resource named HIRES_AWARE in the application executable and for the major subsystem version number being less than 5.

If an app does not have the HIRES_AWARE and the major version number is less than 5, the Windows Mobile OS automatically scales the app to the screen size.

The ‘auto-scale’ uses the dpi values for scaling. The screen sizes (the screen diagonal) is mostly similar. So a VGA screen has more pixels per inch (ie 192dpi, dots-per-inch). Whereas a QVGA screen has about 96 pixels per inch (96dpi).

Dotnet AutoscaleMode

In Visual Studio you can set the FormFactor and Autscale-Mode (auto, none) for a form:

dotnet_dpi_auto  dotnet_formfactor

If AutoScale is set to dpi, everything is OK, the form ‘scales’ automatically. If set to None, the form content is not scaled:

dotnet_form_dpi_auto   dotnet_form_dpi_none

If you start desiging the form with QVGA form factor and switch then to VGA form factor, you can see the change directly:

dotnet_formfactor_vga

Browser applications and VGA screen

Internet browser applications must avoid using fixed pixel count for there screen layout. You can imagine what happens if a element like a table is specified for 240 pixels wide on a VGA screen supporting 480 pixels:

geometry_wm65_VGA__sample3

More Sample screens

Windows Mobile 6.1 QVGA

without and with menubar/taskbar:

geometry_wm61_QVGA_noMenu   geometry_wm61_QVGA_noTaskbar

Windows Mobile 6.5 QVGA

geometry_wm65_QVGA_noMenu   geometry_wm65_QVGA_noTaskbar

Windows Mobile 6.5 VGA

geometry_wm65_VGA__noMenu   geometry_wm65_VGA__noTaskbar


Windows Mobile 6 – Internet Explorer Mobile modes

$
0
0

Since IE6 comes as 6.1.4 or higher, Internet Explorer Mobile can work in IE6 or the older PIE mode.

IE6 means Internet Explorer 6 desktop compatible mode. Which works more or less with known and unknown restrictions. The biggest advantage is that Internet Explorer (IEM) >=6.1.4 supports keyboard event DOM of javascript.

For some web sites you may downgrade to PIE (Pocket Internet Explorer) mode. You will get scroll bars and a standard menu bar and no on-screen zoom option.

To switch to PIE mode in Windows Mobile 6 or Windows Embedded Handheld 6.5 you need to set the following registry key:

[HKEY_LOCAL_MACHINE\Security\Internet Explorer]
MSHTML=0
; 0=PIE mode
; 1=IE6 mode

To control the PIE view mode directly, you can use the following registry key:

[HKEY_CURRENT_USER\Software\Microsoft\Internet Explorer\Main]
"MakeFit"=dword:00000002
; tested in PIE mode
; 2=OneColumn
; 1=FitToScreen
; 0=Desktop
IE6 automatic mode

IE6 automatic mode

IE6 mobile view

IE6 mobile view


IE6 desktop view

IE6 desktop view


PIE desktop view

PIE desktop view


PIE Fit To Screen view

PIE Fit To Screen view


PIE One Column view

PIE One Column view

Windows Mobile – Ctlpnl.exe arguments

$
0
0

Did you know you can launch ctlpnl.exe to open a defined applet directly?

OK, here we go:

ctlpnl.exe cplmain.cpl,26

will open the Wireless Manager. You can use that in a .lnk file if you need a direct option to launch ctlpnl.exe with a specific applet:

255#"\windows\ctlpnl.exe" cplmain.cpl,26

REMEMBER: do NOT add a newline in the .lnk ASCII file!

Here is a list of know arguments:

0  -  Contrast
1  -  Password
2  -  Owner Information
3  -  Power
4  -  Memory
5  -  About
6  -  Backlight
7  -  Align Screen
8  -  Input Method
9  -  Sounds & Reminders
10 -  Remove Programs
11 -  Menus
12 -  Buttons
13 -  Today Settings
14 -  Domain Enrollment
15 -  Beam
16 -  Clock & Alarms
17 -  Configure Wireless Networks
18 -  Regional Settings
19 -  Connections - i.e. My ISP, My Work
20 -  Phone Settings - Network Selection, Call barring etc
21 -  ??
22 -  Manager Certificates
23 -  Bluetooth
24 -  Error Reporting
25 -  GPS Port Settings
26 -  Wireless Manager, WLAN, Bluetooth, Phone
27 -  Encryption
28 -  USB to PC
29 -  Customer Feedback
30 -  Task Manager

Windows Mobile: Hidden Remote Desktop Client Clipboard support

$
0
0

Recently I looked for support of starting an alternative shell when using Remote Desktop Mobile on a Windows Embedded Handheld 6.5.3 device.

MSDN says that I can to specify AlternateShell in a rdp file. As Windows Mobile devices always use \Windows\default.rdp, I added the following two lines and tested what happens.

WorkingDir:s:C:\Program Files (x86)
AlternateShell:s:C:\Program Files (x86)\notepad.exe

Unfortunately the above entries are ignored :-(

But why? I decided to look inside wpctsc.exe I dumped of a WEH device to see which strings (used sysinternals strings app) are known to the Mobile Remote Desktop client. And, no surprise, AlternateShell is not known inside wpctsc.exe. But I saw two other interesting strings around the ones used in rdp files.

\windows\TscShift.txt
GrabFocusOnConnect
MinutesToIdleTimeout
SavePassword
AutoLogon
MCSPort
ServerName
Domain
Password
UserName
DisableFileAccess
BBarEnabled
EnablePrinterRedirection
EnableSCardRedirection
AutoReconnectEnabled
EnableDriveRedirection
EnablePortRedirection
AudioRedirectionMode
BitmapPersistenceEnabled
BBarShowPinBtn
Compress
KeyboardHookMode
MaxReconnectAttempts
Disable Wallpaper
Disable Full Window Drag
Disable Menu Anims
Disable Themes
DesktopHeight
DesktopWidth
ScreenStyle
ColorDepthID
KeyboardLayoutString
0x00000409
KeyboardType
KeyboardSubType
KeyboardFunctionKey
FullScreenAlways
BBarPinned
EnableClipboardRedirection
RDPIdleTimeout

Oh, EnableClipboardRedirection sounds very promising to me. Just thought about the slow data input of barcode scanning into a Remote Desktop application. That transfer is done using keyboard messages with delays in between every key that is simulated.

So, I prepared a default.rdp with the new setting. First I started one remote desktop session of the mobile device and then downloaded the default.rdp created by wpcstc.exe. Then I added one line:

EnableClipboardRedirection:i:1

Then I copied the changed file back to \windows on the device and stopped remote desktop client on the device using the task manager app on the device. To test the new setting I used a small text in notes on the device, marked some text and used the software keyboard to issue a Ctrl+C to copy the text to the clipboard. Then switched to the remote session and tested Ctrl+V inside the servers notepad app. Yes, that works.

To check that with the WEH device and it’s barcode scanning software I switched the wedge method to Block Mode and tested barcode input again in the server’s notepad app.

wedgemode-block

I used a 500 char PDF barcode for the test and it was shown within notepad as fast I did never see before with barcode scanned data transfer (in a remote session). Although I am not a friend of videos I did a short an ugly one using MyMobiler scaled and converted to flv by ffmpeg on a linux machine:

rdp session with block and char mode

By the way, the other interesting string (RDPIdelTimeout) does not work. I just put the line

RDPIdleTimeout:i:0

into my copy of default.rdp and copied it back to \windows on the device. After restarting the remote desktop client on the device it still disconnected after 10 minutes of no user action. Sorry, no help.

WHY are these settings not documented anywhere by Microsoft? Or do you know a location?

Download default.rdp sample: DOWNLOAD:default rdp sample - (Hits: 2, size: 964 bytes)

Mobile development: rdp_autologin updated to support clipboard redirection

$
0
0

The source code of rdp_autologin has been updated and now default.rdp will now include some more lines:

WorkingDir:s:C:\Program Files (x86)
AlternateShell:s:C:\Program Files (x86)\notepad.exe
EnableClipboardRedirection:i:1
RDPIdleTimeout:i:0

where only EnableClipboardRedirection is working.

Will update the code of rdp_autologin and it’s tools to enable you to control the clipboard setting by the registry. Currently it defaults to ENABLED.

See also previous posts.

Windows Server 2012 RDS and Windows Mobile: connection error

$
0
0

For whatever reason MS decided to make Windows 2012 RDS (former Terminal Services, now Remote Desktop Services) not compatible with Windows Mobile 6.x and other Windows CE 5.0 based handheld devices.

Fortunately, if you activated Remote Desktop License Server using ‘Web Browser’ method, you simply have to change the Collections Security settings and disable ‘Allow only … Network Level Authentication’ (NLA).

The following can also apply for Windows 2008 R2 Terminal Server. Check if you activate the Licensing server via “Web Browser” connection or directly. My 2008 R2 server is running OK for Windows Mobile, as a stand-alone server, with 100 licenses and activated via “Web Browser”.

But let start at the beginning.

Basic RDS setup

When you installed Windows 2012 Server within an existing or new Active Directory and then add the Remote Desktop Server role, you have different choices:

AddRolesAndFeatures

You may go on with “Remote Desktop Services scenario-based installation” and then just follow the wizard after selecting “Quick Start”.

AddRolesAndFeatures_2

The wizard will install everything onto one server.

AddRolesAndFeatures_3

Virtual Desktop Infrastructure makes no sense for Windows Mobile clients. They do not need a full virtual windows machine based on a virtual machine. So we select “Session Virtualization”.

The wizard will then deploy all the services and roles and create one default “Session Collection” and “Remote Apps”. At the end you should get following screen:

AddRolesAndFeatures_4

Now check the setup and look at the RDS Overview:

RemoteDesktopServices-Overview

You see we have RD Web Access (unused by Windows Mobile but cannot be removed), no RD Gateway (not needed here), no RD Licensing (we will install that later), the RD Connection Broker, no RD Virtualization Host (as we do not provide virtual machines here) and a RD Session Host with a QuickSession Collection.

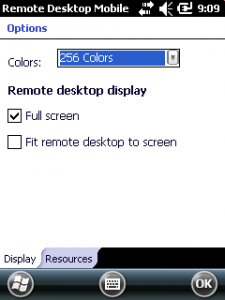
At this stage we can not connect using Windows Mobile client. The NLA setting dis-allows that and we get an error in Remote Desktop Mobile. Just change the NLA setting of the Collection and your Windows Mobile clients can connect.

rdm_cn70   rdm_ck3b

NOTE that there is no License server and we are in the 120-day trial of RDS!

RDS_Collections_EditProperties QuickSessionCollection_Properties

You can access the above Properties using the TASKS menu of Remote Desktop Services-Collections-CollectionName and selecting “Edit Properties”.

If there is no Collection, we can not change the setting! Windows Desktop PCs can connect to that RDS without a Collection installed. We (Windows Mobile client) need a collection to disable NLA.

Setup Remote Desktop License Server

Now setup a Remote Desktop License server, activate it (or better read my later note about the activation method: see “RD License Server Activation Connection Method”) and install some CALs or DALs (licenses per User or Device). Ensure the License Manager shows your License Server without any error. And also check with RD License Diagnoser!

RD_licensing_Manager RD_Licensing_Diagnoser

The licensing mode must match the general Collections properties setting:

Collection_DeploymentProperties

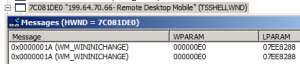
If everything is in place and activated and licensed Windows Mobile Clients can no longer connect!

rdm_security_error

The certificates generated by the License Server are not compatible with Remote Desktop Mobile. They use 4096 bit key-length and SHA256 footprint. The certificates are stored in the registry at [HKEY_LOCAL_MACHINE\SYSTEM\CurrentControlSet\Control\Terminal Server\RCM]. Extracted and converted these certs look like this:

Certificate:
     Data:
         Version: 3 (0x2)
         Serial Number:
             0b:1c:04:1c:9c:74:34:af:41:3a:3c:bf:39:f5:56:bf
     Signature Algorithm: sha256WithRSAEncryption
         Issuer: C=US, ST=Washington, L=Redmond, O=Microsoft Corporation, CN=Microsoft Assurance Designation Root 2011
         Validity
             Not Before: Mar 23 17:41:27 2011 GMT
             Not After : Mar 23 17:48:11 2036 GMT
         Subject: C=US, ST=Washington, L=Redmond, O=Microsoft Corporation, CN=Microsoft Assurance Designation Root 2011
         Subject Public Key Info:
             Public Key Algorithm: rsaEncryption
                 Public-Key: (4096 bit)
                 Modulus:
                     00:a8:ef:ce:ef:ec:12:8b:92:94:ed:cf:aa:a5:81:
                     8d:4f:a4:ad:4a:ec:a5:f0:da:a8:3d:b6:e5:61:01:
  ...
                     2b:a9:44:56:83:be:b6:6e:60:b9:16:1a:e1:62:e9:
                     54:9d:bf
                 Exponent: 65537 (0x10001)
         X509v3 extensions:
             X509v3 Key Usage: 
                 Digital Signature, Certificate Sign, CRL Sign
             X509v3 Basic Constraints: critical
                 CA:TRUE
             X509v3 Subject Key Identifier: 
                 1A:A9:53:45:33:8E:D0:6E:22:52:54:76:39:76:43:1E:FF:79:14:41
             1.3.6.1.4.1.311.21.1: 
                 ...
     Signature Algorithm: sha256WithRSAEncryption
          0b:2e:fa:54:de:11:a4:72:e4:13:1d:8b:bc:42:36:7c:fe:76:
 ...
          fa:be:02:5b:1a:c1:d9:58:66:c2:0c:b3:ce:e4:b4:ec:f4:eb:
          56:4f:9a:cc:cc:b2:a0:a4

RD License Server Activation Connection Method

To fix that and get compatible certificates re-activate the RD Licensing Server using the Web method. In RD Licensing Manager right-click the server name and select Properties. Change the Connection Method to “Web Browser”. Close Properties with OK and again right click the server and then Advanced-Reactivate. Follow the process to reactivate the server using the web browser.

RD_license_server_web_activation

After reactivation delete the following registry keys and reboot the server!

HKEY_LOCAL_MACHINE\SYSTEM\CurrentControlSet\Control\Terminal Server\RCM
 o Certificate
 o X509 Certificate
 o X509 Certificate ID
 o X509 Certificate2

These registry keys will rebuild with lower security after reboot (see also).

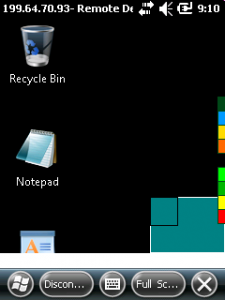
And, surprise, after reboot Remote Desktop Mobile (Windows CE5, Windows Mobile 6.x and Windows Embedded Handheld 6.5.3) can connect!

rdm_cn70_after_reactivation

If you extract and convert the new ‘web-based’ certificates you see the difference:

Certificate:
 Data:
 Version: 3 (0x2)
 Serial Number:
 01:9d:e7:ca:8c:9a:66:80
 Signature Algorithm: sha1WithRSA
 Issuer: L=\x00W\x002\x00K\x001\x002, CN=\x00W\x002\x00K\x001\x002\x00H\x00G\x00O
 Validity
 Not Before: Mar 10 14:50:50 1970 GMT
 Not After : Mar 10 14:50:50 2049 GMT
 Subject: L=\x00W\x002\x00K\x001\x002, CN=\x00W\x002\x00K\x001\x002\x00H\x00G\x00O
 Subject Public Key Info:
 Public Key Algorithm: rsaEncryption
 Public-Key: (2048 bit)
 Modulus:
 00:b6:7e:f2:41:23:f1:f3:cf:44:90:e7:fc:ba:3f:
 ...
 d0:51:d1:55:8c:6b:d0:f6:65:e5:c4:d2:09:1d:d0:
 17:c7
 Exponent: 65537 (0x10001)
 X509v3 extensions:
 X509v3 Basic Constraints:
 CA:TRUE, pathlen:0
 1.3.6.1.4.1.311.18.8:
 Q.G.K.8.V.3.W.2.K.H.P.D.6.W.4.V.M.Q.2.G.3.T.H.3.K.C.8.J.W.K.W.D.M.4.Y...
 Signature Algorithm: sha1WithRSA
 3a:1d:94:36:5d:32:12:6f:5e:e3:76:9f:cb:2b:1c:92:c2:ff:
 ...
 ac:1e:23:b2:a0:73:ff:6f:12:f8:86:24:4b:95:15:54:c0:a2:
 ba:05:00:e3

The key length is only 2048 bits and the security algorithm is SHA1.
If you had activated the “Web browser” Connection method before Activating the server the first time, you do not need to touch the registry and reactivate the server!

Conclusion

Windows Mobile’s Remote Desktop Mobile (RDM) application connects fine if the right certificates are generated when Activating the RD License Server. RDM will not connect, if SHA256 and 4096 bits key are used on the server. RDM does not support NLA nor SSL/TLS!

What MS says

RDS 2008, 2008R2, and 2012 will not allow connections from older RDP 5.x clients.

To get around this add the following registry key to the RDS Session Host

Subkey: HKEY_LOCAL_MACHINE\SYSTEM\CurrentControlSet\Control\Terminal Server\RCM
Registry entry: Use512LenPropCert
Data type: REG_DWORD
Value: 0 or 1

This is far less secure (512bit encryption vs 2048bit), and you won't be able to take advantage of the features of later versions of the RDP protocol, but older clients will be able to connect.

What wonders me about that, is that it says ‘no support of 2048 length key’, but the key length is 2048 in my validated tests. Possibly they mean, does not support 4096 key length but 2048 (which is set with the Use512LenPropCert?).

Test your installation

If you like to check the certificates of your installation you may use the attached demo application: “RDS2012_security”. It will just read the registry and show the certificates data.

RDS_Security_CertifcateDump_not_ok RDS_Security_CertifcateDump_ok

The code (included in the attachment) just reads the registry and extracts the certification data. The data is stored binary with some extra data at the beginning. There are twelve bytes to remove to get the raw certificate (all these certs start with 0×30 0×82). So the reg might look like this:

"X509 Certificate"=hex:02,00,00,00,04,00,00,00,f1,05,00,00,30,82,05,ed,30,82,\
  03,d5,a0,03,02,01,02,02,10,0b,1c,04,1c,9c,74,34,af,41,3a,3c,bf,39,f5,56,bf,\
  30,0d,06,09,2a,86,48,86,f7,0d,01,01,0b,05,00,30,81,88,31,0b,30,09,06,03,55,\
...

Then the tool has to remove the first 12 bytes and we get the raw data:

30,82,05,ed,30,82,\
  03,d5,a0,03,02,01,02,02,10,0b,1c,04,1c,9c,74,34,af,41,3a,3c,bf,39,f5,56,bf,\
  30,0d,06,09,2a,86,48,86,f7,0d,01,01,0b,05,00,30,81,88,31,0b,30,09,06,03,55,\
...

Here is the simple code that does this in csharp and then initializes a new X509Certificate2 object:

        const string rd_mainRegKey = @"SYSTEM\CurrentControlSet\Control\Terminal Server\RCM"
        string[] _x509ValueNames = new string[] { "X509 Certificate", "X509 Certificate2" };
...
        byte[] readX509Cert(string sValueName)
        {
            byte[] buf = null;
            using (RegistryKey rk = Registry.LocalMachine.OpenSubKey(rd_mainRegKey, false))
            {
                byte[] bufTemp = (byte[]) rk.GetValue(sValueName);
                //remove first 12 bytes
                buf = new byte[bufTemp.Length - 0x0b];                
                Array.Copy(bufTemp, 0x0c, buf, 0, bufTemp.Length - 0x0c);
            }
            if(sValueName.EndsWith("2"))
                _x509Certificate2=new X509Certificate2(buf);
            else
                _x509Certificate = new X509Certificate2(buf);

            return buf;
        }

Now you can even save the cert or, like the demo does, just show the key length and used algorithm.

DOWNLOAD:rds_security - test the certs of an win 2012 RDS server. (Hits: 42, size: 43.74 kB)


Mobile Development: writing today screen plugins the easy way

$
0
0

today Plugins with compact framework

The following today or home screen plugins for Windows Mobile are based on a work of CrisText at codeplex.

The codeplex sources provide a framework to create home screen plugins very easily.

You just start a Form or UserControl and add the attribute “[TodayScreenItem("a unique name")]” before the class. Further on, the framework looks for such plugins dynamically and you can add or remove plugins by just adding or removing DLLs.

I did two plugins, one shows the Intermec device ID and the other enables you to have buttons on the home screen to directly launch applications.

Show some information

The first plugin is very simple. An user control that just shows some static text (see the lower info on the screen shot):

today_date_only today_with_apps_and_deviceID

Simple code:

using System;
using System.Linq;
using System.Collections.Generic;
using System.ComponentModel;
using System.Drawing;
using System.Data;
using System.Text;
using System.Windows.Forms;

using ChrisTec.WindowsMobile.TodayScreen;

namespace todayDeviceID
{
    [TodayScreenItem("todayScreenDeviceID")]
    public partial class todayDeviceID : UserControl
    {
        private Label label1;
        private PictureBox pictureBox1;
    
        public todayDeviceID()
        {
            InitializeComponent();
            int w = System.Windows.Forms.Screen.PrimaryScreen.WorkingArea.Width;
            int h = System.Windows.Forms.Screen.PrimaryScreen.WorkingArea.Height;
            int factor = w / this.Width;
            this.Width = w;
            this.Height = this.Height * factor;
            
            this.pictureBox1.Height = this.Height - (pictureBox1.Top*2);
            pictureBox1.Width = pictureBox1.Height;    //make a square box

            label1.Width = this.Width - pictureBox1.Width;
            label1.Height = this.Height;

            label1.Text = ITC_DeviceID.getDeviceID();
        }
		...

The above simply has a label and a picturebox on a user control.

To get the above working on your device you must install the ChrisTec.WindowsMobile.TodayScreen cab file or at least the files:

  • ManagedTodayScreenItem.dll
  • ManagedTodayScreenItemHost.exe

And you must register the today plugin framework:

REGEDIT4

[HKEY_LOCAL_MACHINE\Software\Microsoft\Today\Items\Managed Items]
"DLL"="%CE1%\\Managed Today Screen Framework\\ManagedTodayScreenItem.dll"
"Enabled"=dword:00000001
"Options"=dword:00000000
"Selectability"=dword:00000002
"Type"=dword:00000004

All files should be placed inside “\Program Files\Managed Today Screen Framework\”.

Debug and deployment

You should setup your plugins to be deployed to the above directory. So you can easily update and test your plugins. Unfortunately you can not replace any existing plugin as long as Managed Items are enabled in Home screen settings. So I added a project and application that works similar to the plugin framework loader. You may use testPlugin to test and debug your plugin:

testPlugin

Then test your plugin by Start-Settings-Home:Items and enabling “Managed Items”:

settings_home_1 settings_home_2

If everything is correct, you will see your plugin on the home screen.

The other plugin I wrote is a program launcher. I started another Control Library SmartDevice project. Just add the attribute to let the framework know that this is another plugin:

using System;
using System.Linq;
using System.Collections.Generic;
using System.ComponentModel;
using System.Drawing;
using System.Data;
using System.Text;
using System.Windows.Forms;
using System.Runtime;

using ChrisTec.WindowsMobile.TodayScreen;

namespace todayApp1
{
    [TodayScreenItem("todayScreenApps1")]
    public partial class todayApp1 : UserControl
    {
        theApps apps = new theApps();
        myApps.myApp[] allApps;

        public todayApp1()
        {
            InitializeComponent();
            allApps = apps.myAppList.ToArray();
			...

The above uses a class to determine the application buttons to create. This theApps class uses a xml file to let you define launcher buttons:

<?xml version="1.0" encoding="UTF-8"?>
<myApps>
   <myApp>
     <title>The File Explorer</title>
     <iconFile>\Program Files\managed today screen framework\fexplore.gif</iconFile>
     <exeFile>\Windows\fexplore.exe</exeFile>
     <args>\My Documents</args>
   </myApp>
   <myApp>
     <title>Internet Explorer</title>
     <iconFile>\Program Files\managed today screen framework\iexplore.gif</iconFile>
     <exeFile>\Windows\iexplore.exe</exeFile>
     <args>www.google.de</args>
   </myApp>
</myApps>

You can see that you can define the exe to start, arguments for the exe, a title and a symbol.

The todayApp user control adds buttons dynamically and will show a scroll bar if more than 4 apps are defined.

Now start your own home screen plugin the easy way.

Source code at: https://github.com/hjgode/todayPlugins

Mobile Development: Subclass foreign Window using injectDLL

$
0
0

Recently we needed to show and hide the SIP (Software Input Panel) inside a full screen Remote Desktop Mobile session.

The first challenge is to control the SIP without having a menu bar with the SIP symbol inside. To get this working you can assign a hardware keyboard button, it must be an App button, to show the SIP. See Settings>Personal>Buttons and assign “<Input Panel>” to the hardware key.

app_button_to_input_panel RDM_fullscreen_option RDM_fullscreen RDM_fullscreen_with_SIP

Unfortunately the SIP will be hidden immediately after being shown if RDM is started with Full Screen option.

To overcome this I looked at the Windows Messages inside the RDM window tree and found that there is a Windows Message WM_WININICHANGE send to the main RDM window every time the SIP is shown. Inside the UIMainClass window the SIP show will result in some more messages, Now, if we can suppress the WM_WININICHANGE message, the SIP may stay until hidden manually, hopefully.

tsshellwnd_on_sip_show  UIMainClass_on_SIP_show

But how can one hook in a foreign Message Pump (WndProc)? Fortunately there is a general option provided by Windows CE / Mobile to inject one or more DLLs into every started process. Simply add your DLL to the registry key HKLM\System\Kernel\InjectDLL. The type of InjectDLL is REG_MULTISZ.

Now the DLL that I wrote compares the Module File Name of the process that is calling DLL_ATTACH with the Module File Name of RDM, which is “\Windows\wpctsc.exe” on Windows Mobile/Embedded Handheld. If the Module File Name matches, the code looks for the Windows Class “TSSHELLWND”. If this is found, the RDM window has been loaded and initialized. Now the DLL code looks for the child window with class “UIMainClass”. This window marks a remote session has been started. If found, the code uses SetWindowLong and hooks a custom WndProc into the main RDM window. This custom WndProc simply looks for the Window Message that hides the SIP and just returns a TRUE, as if the message has been processed. The other window messages are forwarded unchanged to the original WndProc. The message we filter is WM_WININICHANGE with lParam==133071496.

Remember that ‘subclassing’ a window is only possible from inside the process that created the window. But using InjectDLL the DLL code is part of the RDM process (and all others) and you can subclass the ‘foreign’ window.

RDM_fullscreen_with_SIP

The only ‘disadvantage’ here is the position of the SIP. As there is no menu bar, the SIP is floating above the lower border. But there are custom SIPs you can move around, if this is a no-go for you.

The demo RDMinjectDLL.dll has to be copied to \Windows and then you need to edit the registry of the device:

REGEDIT4
[HKEY_LOCAL_MACHINE\System\Kernel]
"InjectDLL"=hex(7):\
 5C,57,69,6E,64,6F,77,73,5C,52,44,4D,69,6E,6A,65,63,74,44,6C,6C,2E,64,6C,\
 6C,00

The hex codes are nothing else than the string “\Windows\RDMinjectDLL.dll” (without quotes). After changing the registry, the device needs to be rebooted.

During development I had to remove the reg entry, reboot, deploy a new version, change the reg back and reboot again to test the new version.

Download DLL and .reg file: DOWNLOAD:RDMinjectDLL - (Hits: 178, size: 5.62 kB)

Mobile Development – Start apps with another using injectDLL

$
0
0

I already posted one article about using injectDLL, one about subclassing a foreign window. This time injectDLL is used to start and stop an application when another app is started. Remember that every DLL listed inside the MULTI_SZ registry key HKLM\System\Kernel\injectDLL is loaded into every process.

I would like to add some battery and wifi indicator to a full screen Remote Desktop Mobile (RDM) session. There are two specialized applications that display a small bar graph on the right of the screen, one for the battery level and one for the WiFi RSSI.

tsshellwnd_normal_with_wifi_and_batt_monitor_bars

The upper right one is for the WLAN RSSI and the lower bar shows the battery charge level.

As these apps should only add there display when RDM ist started, I added them to an injectDLL.

The injectDLL is loaded into every process that is started on the Windows Mobile device. Inside the DLLMain function, that every DLL has to implement, the code checks if the loading process is “\windows\wpctsc.exe”:

BOOL APIENTRY DllMain( HANDLE hModule, 
 DWORD ul_reason_for_call, 
 LPVOID lpReserved
 )
{
 if (ul_reason_for_call == DLL_PROCESS_ATTACH)
 {
 // Disable the DLL_THREAD_ATTACH and DLL_THREAD_DETACH notification calls
 DisableThreadLibraryCalls ((HMODULE)hModule);

 TCHAR szModuleFileName[MAX_PATH+1] = {0};
 TCHAR szRecord[MAX_PATH] = {0};
 if ((GetModuleFileName(NULL, szModuleFileName, MAX_PATH)) == NULL){
   wsprintf(szRecord, L"GetModuleFileName failed!");
   WriteRecordToTextFile(szRecord);
   return TRUE;
 }

 if (_wcsicmp(szModuleFileName, MODULE_FILENAME) != 0){
   wsprintf(szRecord, L"Compare ModuleFileName failed: %s", szModuleFileName);
   WriteRecordToTextFile(szRecord);
   return TRUE;
 }
...
 if ((hThread = CreateThread(NULL, 0, WaitForProcessToBeUpAndReadyThread, 0, 0, NULL)) == NULL)

MODULE_FILENAME holds the full name of the process we want to use. The above code simply returns without further action if the loader does not match the process we are looking for. If the process matches, the code creates a thread that will do the further processing. This avoids that the further actions block the watched process from being blocked or slow down.

The created thread just waits for the windows being ‘visible’ to the system and then starts the external processes:

  while ((hWndRDM = FindWindow(L"TSSHELLWND", NULL)) == NULL)
  {
...
  do{
    hChildWin=FindChildWindowByParent(hWndRDM, L"UIMainClass");
  }while(hChildWin==NULL);
...
  if(runProcess(L"\\Windows\\RdmAddonBatt2.exe", L"")==0)
    DEBUGMSG(1, (L"\\Windows\\RdmAddonBatt2.exe started\n"));
  else
    DEBUGMSG(1, (L"\\Windows\\RdmAddonBatt2.exe not started?"));
  if(runProcess(L"\\Windows\\RdmAddonWiFi.exe", L"")==0)
    DEBUGMSG(1, (L"\\Windows\\RdmAddonWiFi.exe started\n"));
  else
    DEBUGMSG(1, (L"\\Windows\\RdmAddonWiFi.exe not started?"));
...

In the above code the external processes are hard coded, but it would be easy to use the registry or a configuration file to replace the hard coded file names.

There are much more useful scenarios for using injectDLL.

Code at Github: RdmInject, RdmAddonBatt2, RdmAddonWiFi


Viewing all 18 articles
Browse latest View live